Creatify Team
SHARE


IN THIS ARTICLE
How to make a great reel: Create engaging Instagram content in minutes
Instagram Reels get more reach than posts or Stories, but most creators struggle with production time and editing skills. This guide walks you through making scroll-stopping reels quickly - from planning and shooting to editing and posting, with workflows that work whether you're filming yourself or using AI tools.
Why Instagram Reels matter right now
Recent data shows Reels averaging 2-3x more reach than static posts for most accounts. The algorithm heavily favors video content in Explore and recommendation surfaces, pushing reels to non-followers' feeds more aggressively than photos or carousels.
But views alone don't define a great reel. What matters is retention (how long people watch), saves (people bookmarking your content), shares (sending to friends), and profile visits. Creators consistently find that these engagement signals correlate more with reach than likes alone - saves, shares, and completion rate tend to predict performance better than raw like counts.
Source: Instagram.com
Modern reel makers - from Instagram's native editor to AI reel generators - let anyone create polished content fast. You don't need fancy equipment or editing skills anymore. You need a hook, clear value, and the right tools.
What makes a reel actually "great"
Great reels hook viewers in the first 1-2 seconds, deliver clear value, and end with a satisfying payoff or call-to-action. They're shot vertically (9:16 format), visually clear, and keep attention through pacing - not just flashy transitions.
The algorithm cares about watch time (how much of your video people watch), replays (watching it again), saves (bookmarking for later), and shares (sending to friends). These engagement signals matter more than likes because they show genuine value.
Reels perform best when they're "native" - created for Instagram without watermarks from other platforms. TikTok logos, YouTube timestamps, or video templates with competitor branding hurt reach. The algorithm wants platform-first content.
Planning your reel in minutes
Start with a goal: reach (discovery), trust-building (authority), clicks (traffic), or sales (conversion). Every reel should have one clear purpose that shapes your hook and call-to-action.
Use a simple 3-part structure: hook (first 2 seconds grabs attention) → value (middle delivers on the promise) → call-to-action (end tells them what to do next). This framework works for everything from tutorials to product showcases.
Beginners can use plug-and-play templates:
Before/After: Show transformation in 15 seconds
3 tips format: "3 mistakes everyone makes with X"
Do this, not that: Side-by-side comparison
Day in the life: Behind-the-scenes workflow
Quick tutorial: Single problem, single solution
Pair your script with simple B-roll ideas: hands working, product close-ups, workspace shots, screen recordings, or text-on-background slides. You don't need complex filming.
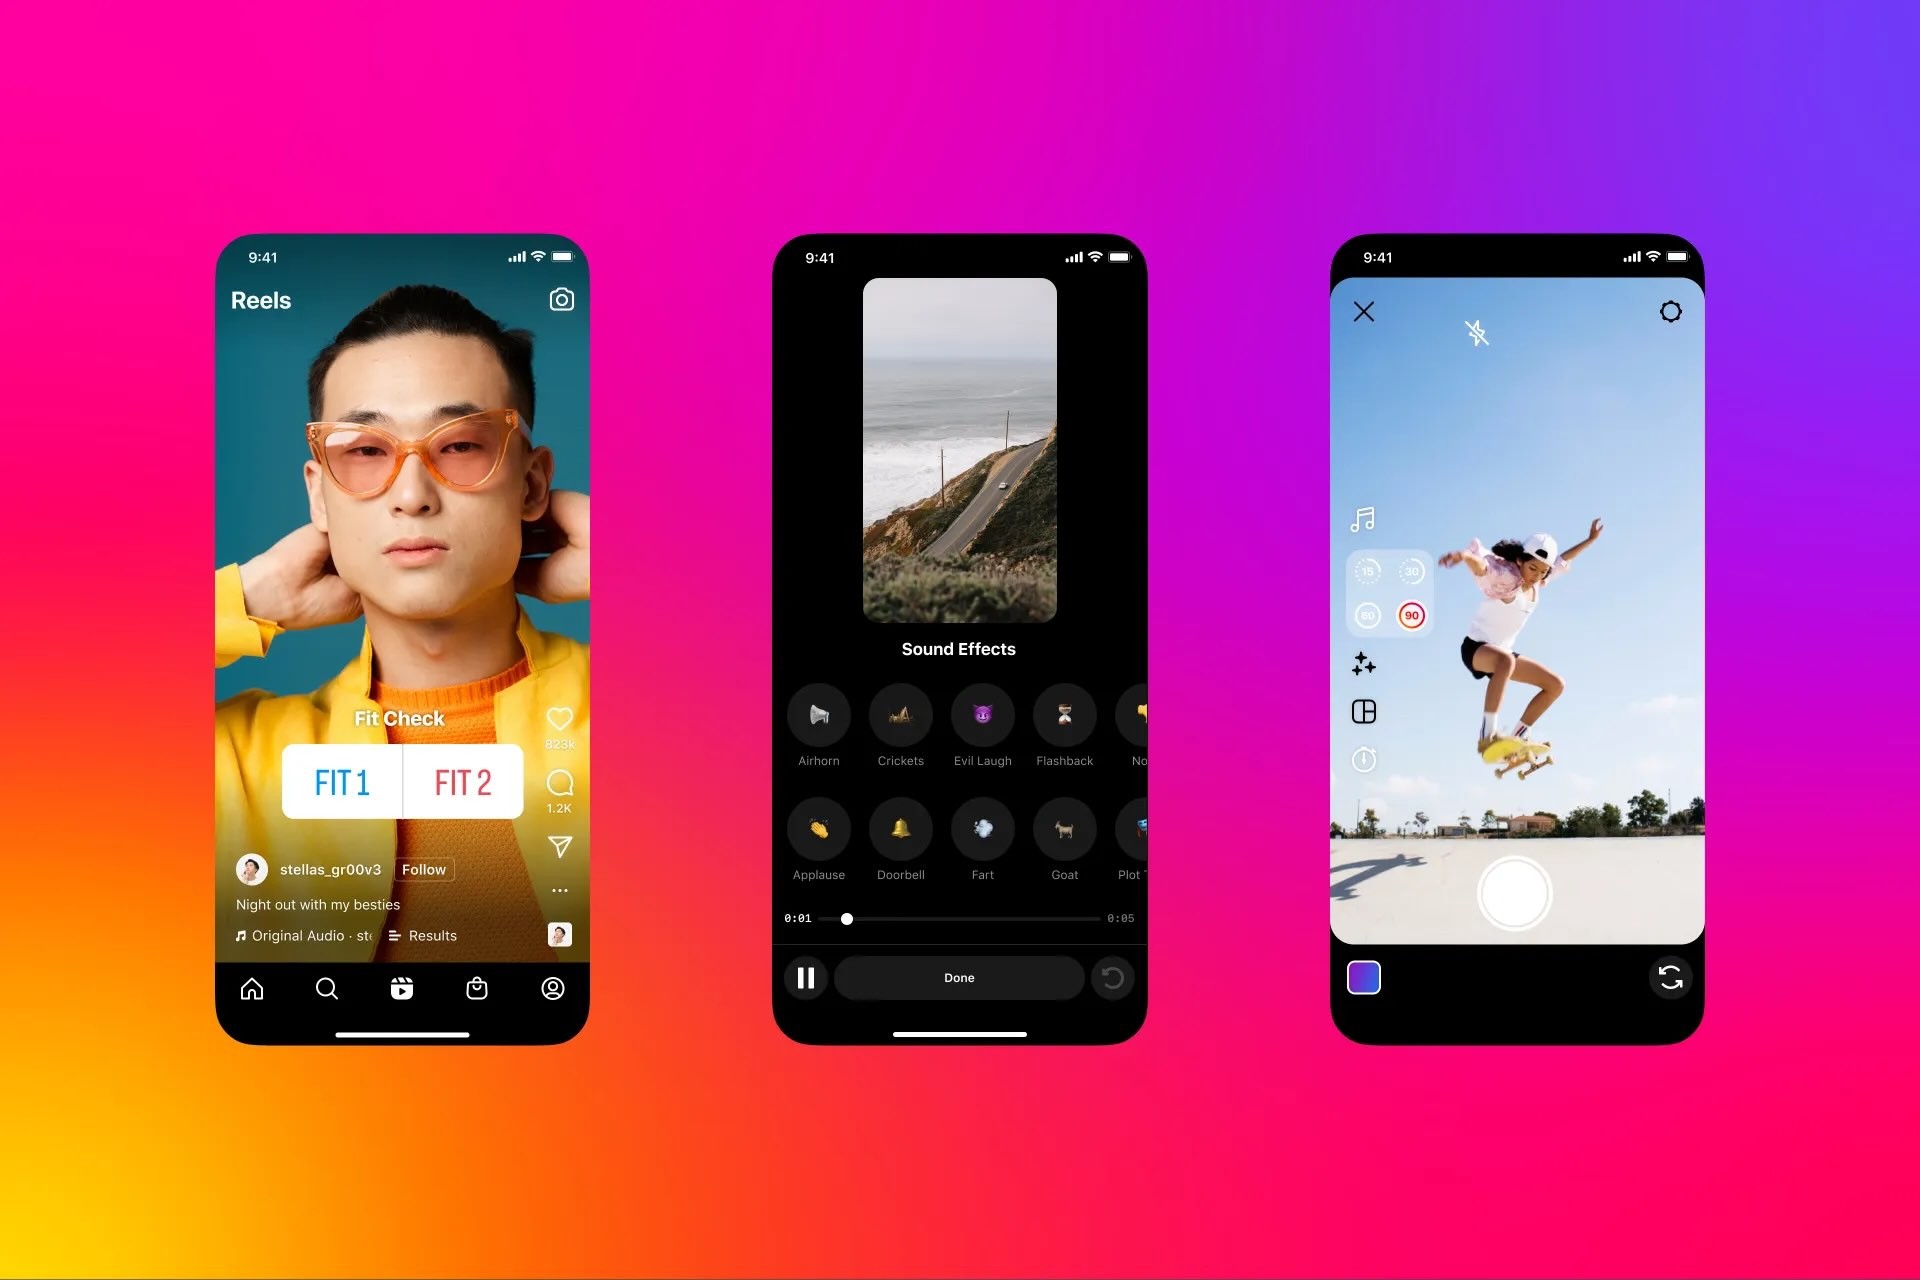
How to make a reel using Instagram's native editor
Open Instagram and tap the plus icon, then select "Reel." You can record directly in the app or upload pre-recorded clips from your camera roll.
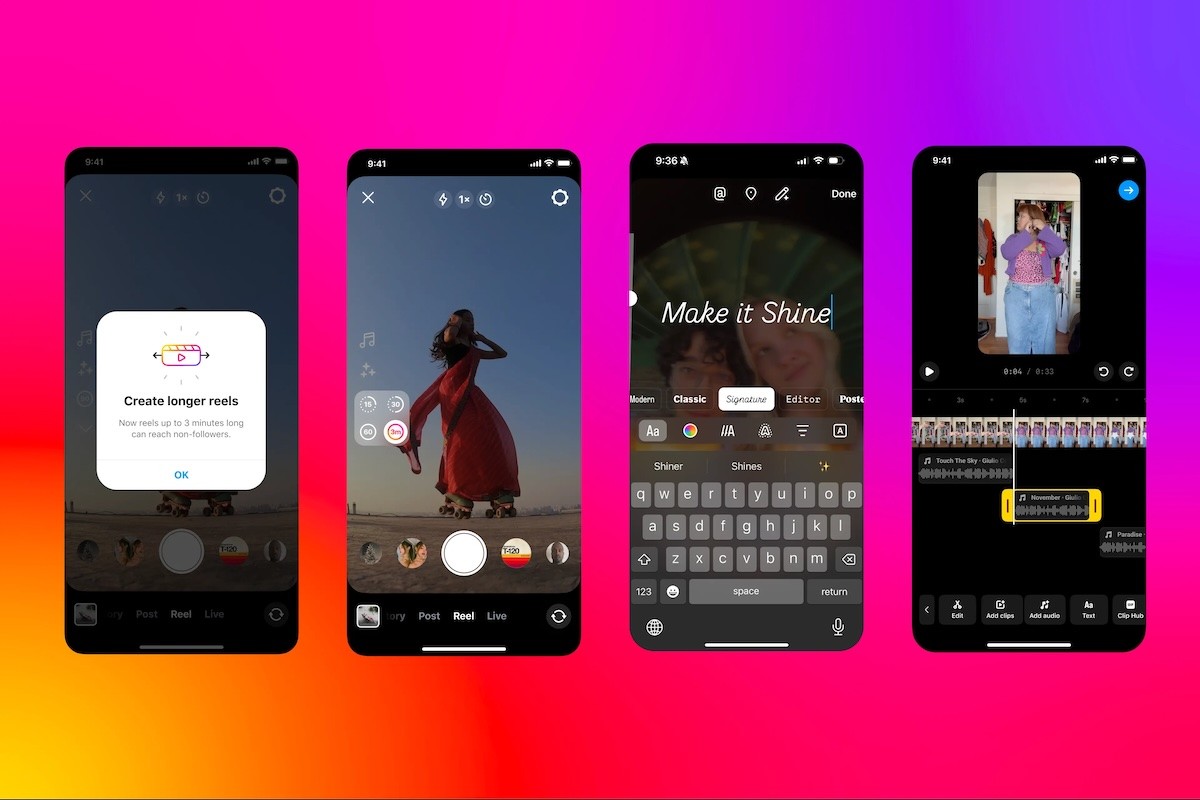
Instagram's reel maker includes essential tools:
Speed control: Adjust playback speed for dramatic or comedic effect
Timer: Set a countdown for hands-free recording
Alignment: Line up multiple takes perfectly
Text overlays: Add captions that sync with your video
Stickers and filters: Quick visual enhancements
Audio library: Search trending sounds and music
Add captions by tapping the "Captions" button after recording - Instagram's auto-caption feature transcribes speech automatically. Burned-in subtitles (text that's part of the video, not just captions) improve retention because 85% of videos are watched without sound.
Shooting basics that actually matter
Shoot vertically in 9:16 format (full-screen mobile). Horizontal videos get cropped and lose impact. Use the full screen space.
Good lighting beats expensive cameras every time. Film facing a window for natural light, or use a basic ring light if filming at night. Avoid overhead lighting that creates harsh shadows.
Clear audio is non-negotiable. Film in quiet spaces, speak clearly toward your phone's microphone, or use a $20 lavalier mic if you're doing regular talking-head content.
Simple setups work: phone propped on books, small tripod, or even leaned against a laptop. Your background should be clean but not sterile - a workspace, bookshelf, or plain wall all work better than a messy room.
Crafting scroll-stopping hooks
In practice, the first 1-2 seconds often decide if people keep watching or scroll past. Start with immediate value or curiosity - no lengthy intros.
High-impact hooks that work:
Pattern interrupt: "Stop doing this with your Instagram bio"
Surprising claim: "Nobody tells you this about engagement rates"
Visual change: Jump cut from problem to solution immediately
Direct address: "If you're posting Reels and getting 200 views..."
Urgency: "Instagram just changed how Reels work"
Put your hook in on-screen text too, not just voiceover. Many people scroll with sound off and only unmute if the text grabs them. Use large, high-contrast text that's readable instantly.

Source: pexels.com
Storytelling in 15-90 seconds
Short-form video requires micro-storytelling frameworks:
Problem → tension → fix: Show the pain, amplify why it matters, deliver the solution
Myth → truth: Bust a common misconception with proof
Step-by-step process: Break down a complex task into 3-5 quick steps
Pace your cuts roughly every 1.5-2 seconds to maintain attention without overwhelming viewers. This doesn't mean frantic jump cuts - it means changing the visual element (new shot, text overlay, zoom, or angle shift) frequently enough to keep eyes on screen. Many creators find this rhythm works well for retention.
Build to a payoff. Don't just stop - end with a clear takeaway, transformation result, or call-to-action that makes watching feel worthwhile.
Editing workflow: Native vs third-party reel maker apps
You can edit directly in Instagram's reel maker or use a dedicated reel maker app to pre-edit, then upload. Each approach has tradeoffs.
Instagram's native editor:
Pros: No export/upload time, works with trending audio seamlessly, no quality loss
Cons: Limited editing features, harder to batch-create content, can't save drafts externally
Third-party reel maker apps:
Pros: More control over timing, effects, and transitions; can batch-produce content; save templates
Cons: Must export and re-upload (adds time), might lose some quality, trending audio requires more steps
For beginners, Instagram's native tools are usually enough. For people making 10+ reels weekly, a dedicated reel maker app saves time through templates and batch workflows.
Advanced editing techniques that improve retention:
Jump cuts: Remove dead air and "um"s to tighten pacing
J-cuts: Audio from the next clip starts before the visual cut (creates smooth transitions)
Beat markers: Time visual cuts to music beats for satisfying rhythm
Selective slow-motion: Emphasize key moments without slowing the whole clip
Smart use of audio, text, and captions
Trending audio can boost discoverability because Instagram pushes content using popular sounds to more feeds. Search the audio library for sounds with "Trending" labels.
But original audio has value too - it becomes your branded sound that people associate with your content, and it can be repurposed across platforms without copyright issues. For tutorials and educational content, original audio often performs better than random trending songs.
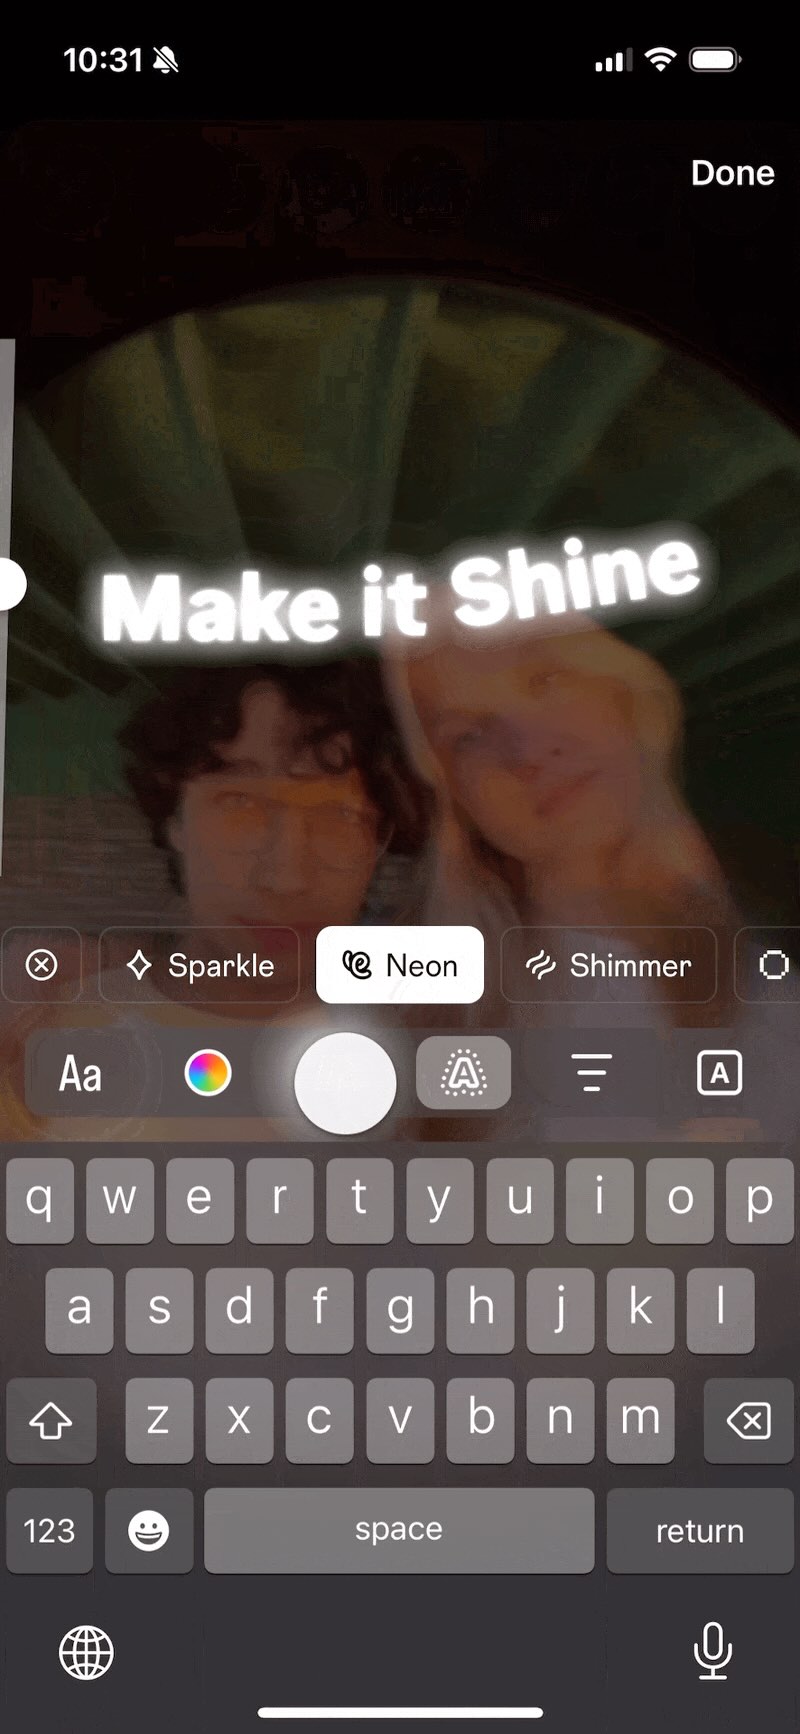
On-screen text best practices:
Use big, bold fonts with high contrast (white text on dark background or vice versa)
Keep essential text in the "safe zone" (middle 60% of screen, avoiding top/bottom where UI elements appear)
Sync text appearance to moments in your story - new text appears when you make new points
Limit text per frame to one key sentence so it's readable in 2 seconds
Caption strategy matters beyond just the video's text overlays. Your written caption should have a compelling first line (the hook before "...more"), include relevant keywords naturally, and end with a clear call-to-action like "Save this for later" or "Follow for daily tips."
Making reels with AI tools (without losing authenticity)
AI reel generators are useful for specific workflows - not replacing creativity, but handling tedious production tasks.
Realistic use cases where AI actually helps:
Turning blog posts or scripts into video outlines
Generating B-roll footage when you don't have original footage
Auto-generating captions and subtitles
Creating avatar-based talking head videos when you don't want to appear on camera
Producing multiple variations of the same core message for testing
The key is adding your own voice, footage, or commentary on top of AI-generated bases. Generic AI templates that use stock everything strip away the personality that makes content engaging.
How to create a reel with Creatify's AI Avatar
If you want to create talking-head style reels without filming yourself, Creatify's AI Avatar feature lets you generate realistic avatar videos from just a script.

Step 1: Start with AI Avatar
Open Creatify and click on AI Avatar. You'll see two options: choose from the avatar library (1,500+ realistic AI avatars) or upload your own image to create a custom avatar (BYOA).
Step 2: Select your avatar
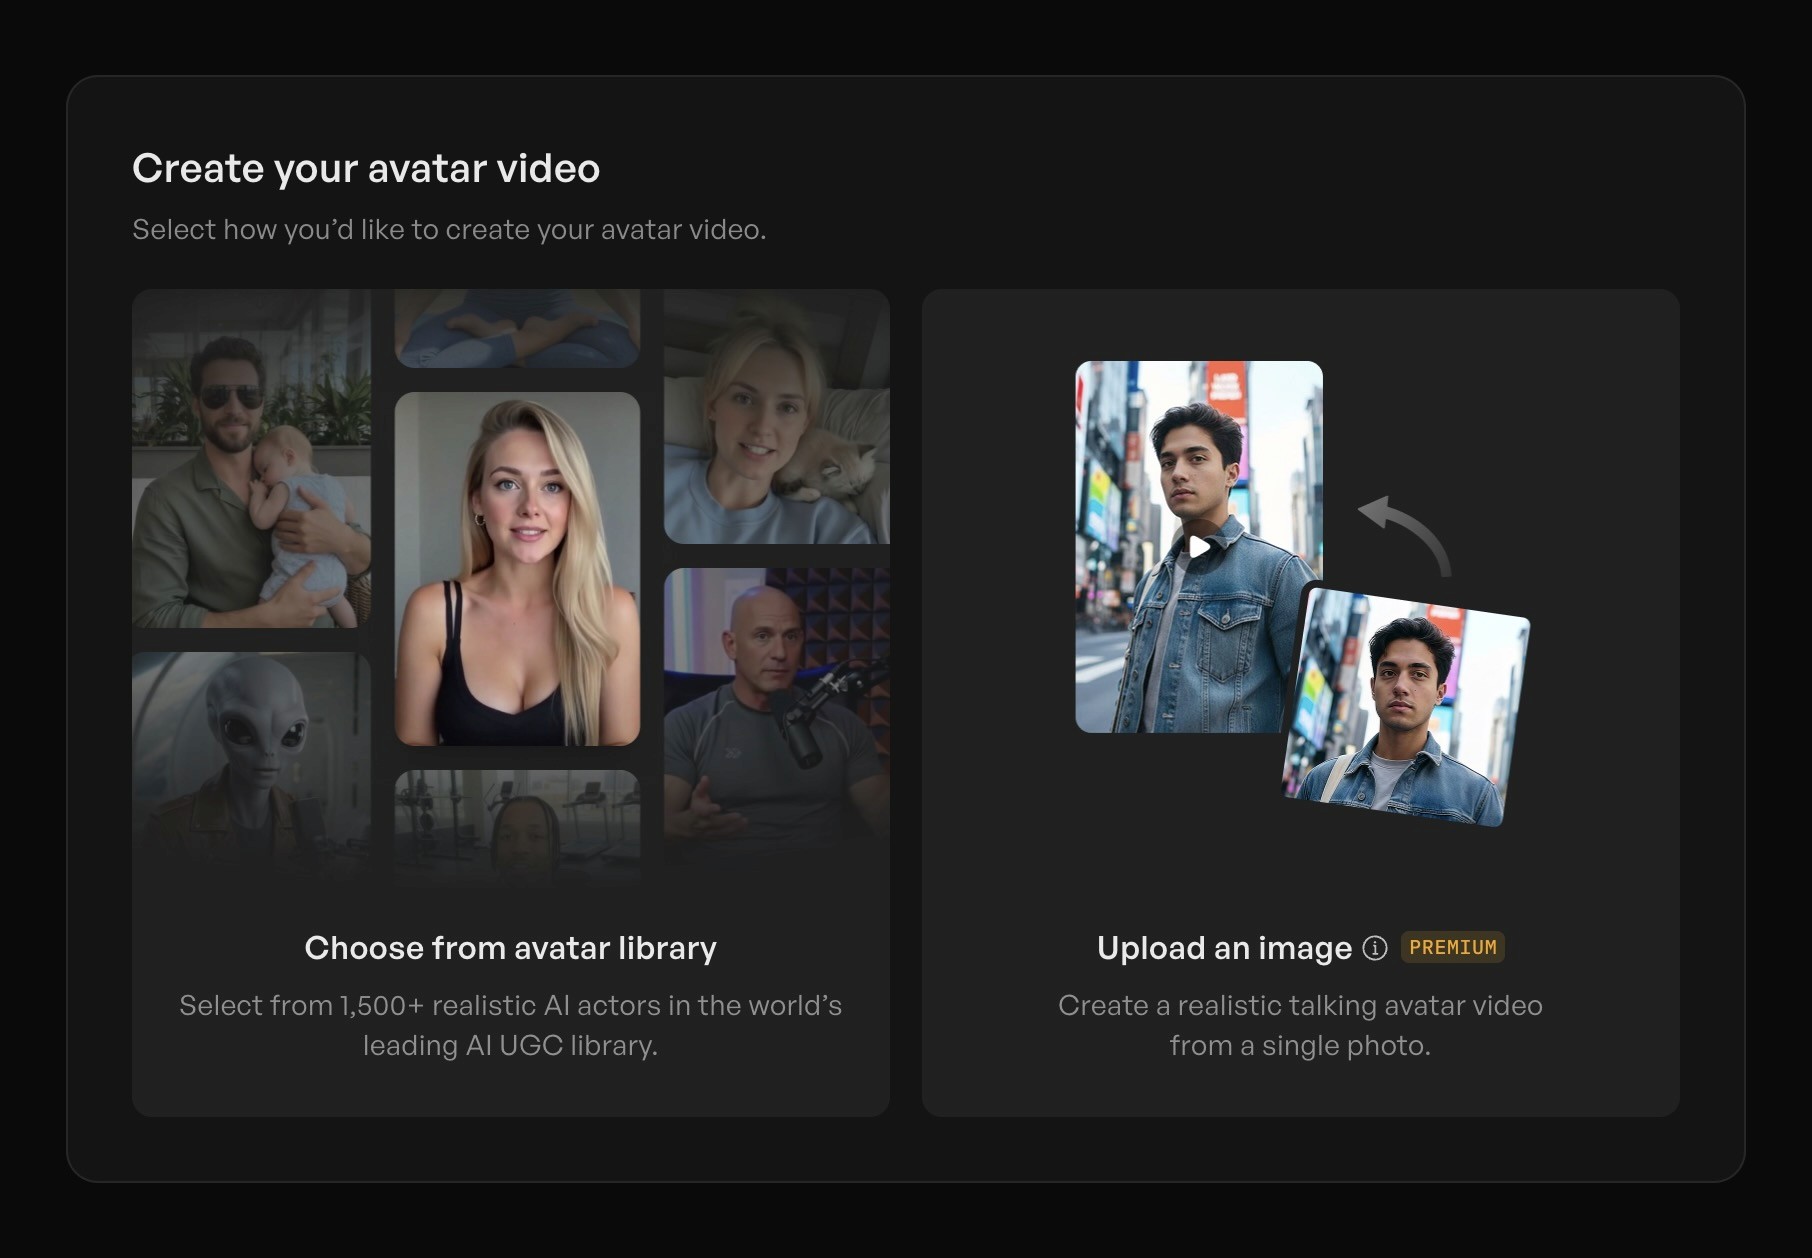
If choosing from the library, browse by type (realistic or styled), gender, age group, or industry to find an avatar that matches your brand personality and target audience. Filter by characteristics like "Young Adult" for a younger demographic or specific industries like "Business Services" or "Education."
If uploading your own image, select a clear photo where the face is well-lit and facing forward - this creates your personalized talking avatar.
Step 3: Write your script
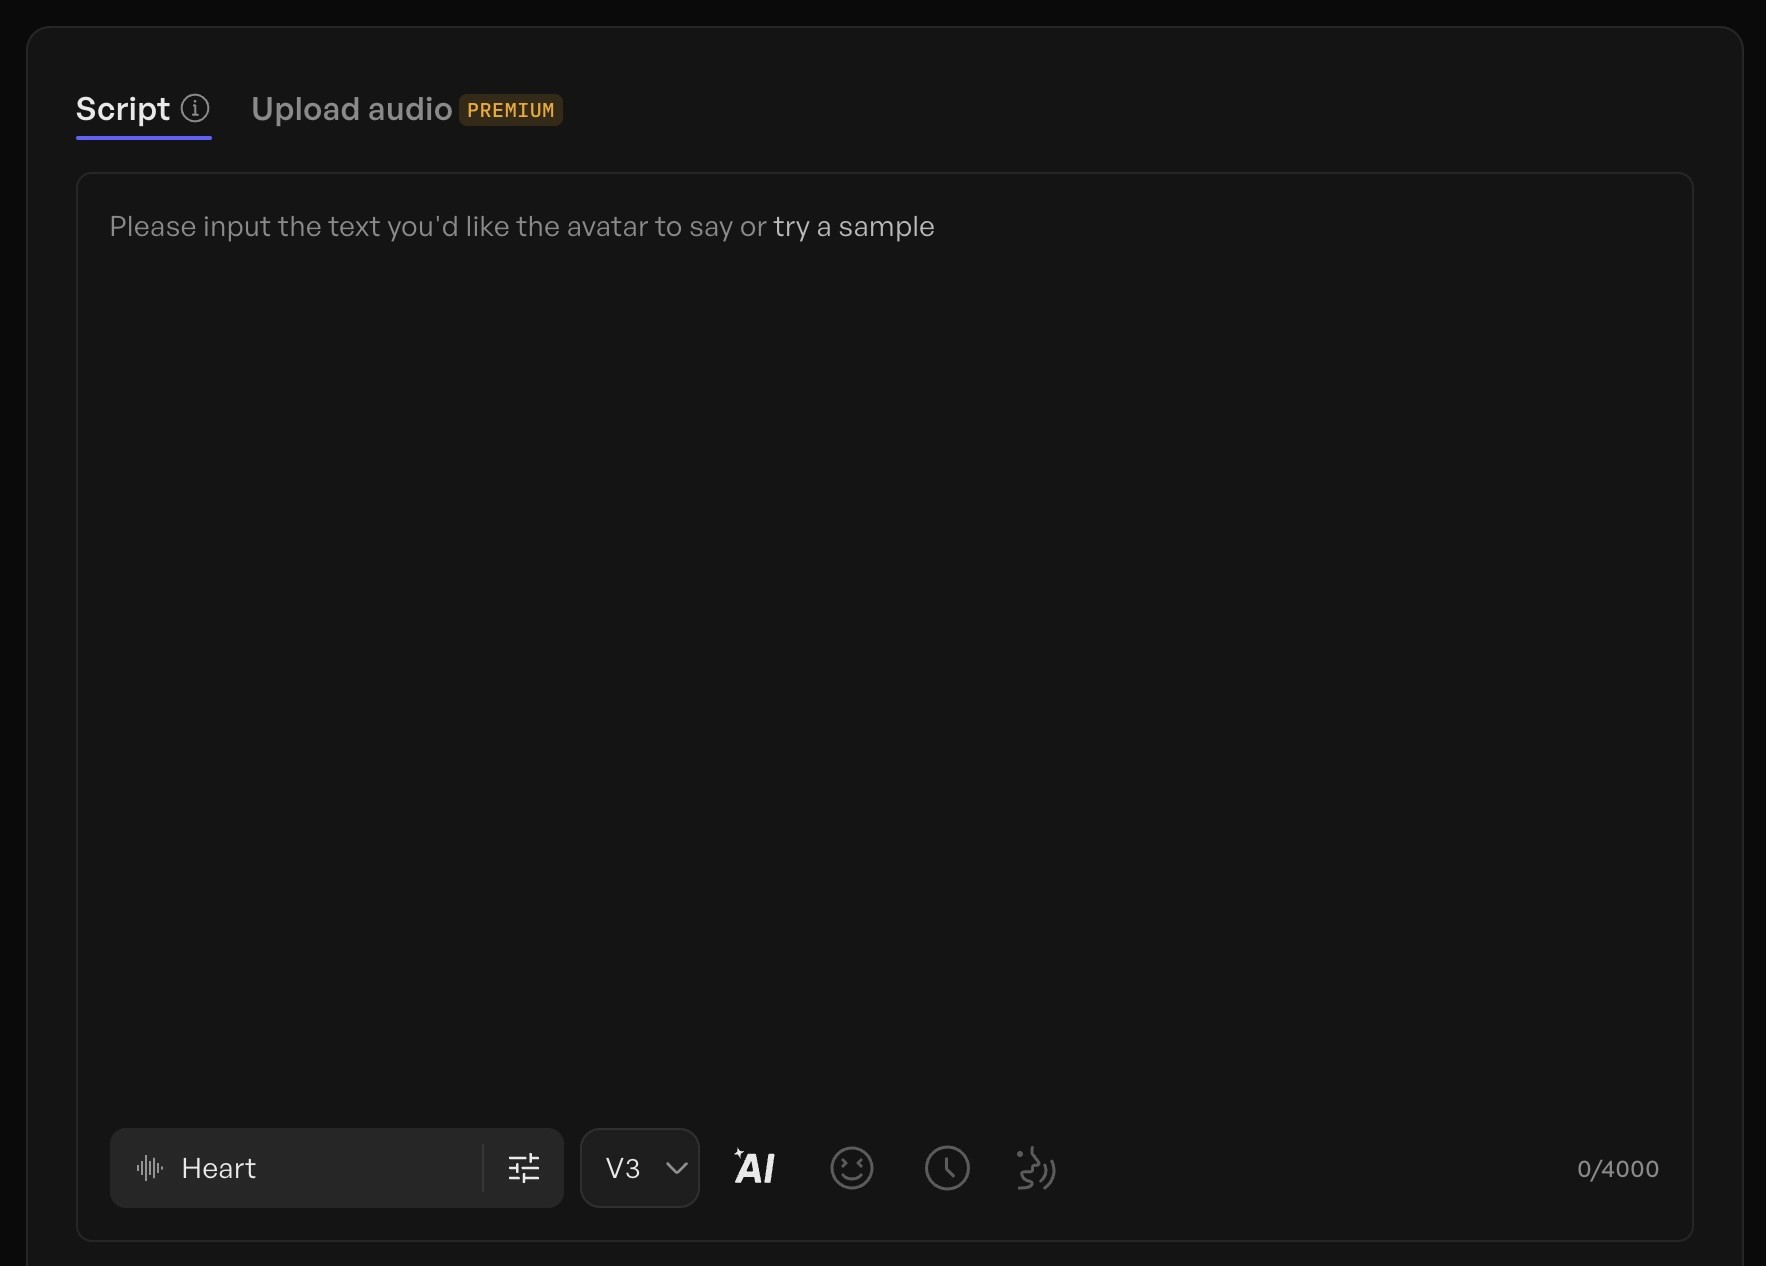
Input your reel script in the text box (up to 4,000 characters). Keep it under 60 seconds of speaking time for Instagram reels. Structure it with your hook in the first sentence, core value in the middle, and CTA at the end.
Step 4: Choose voice and settings
Select from 140+ AI voices across 75+ languages. Pick a voice that sounds natural for your content style - preview a few options before choosing. Adjust voice settings like tone and pacing if needed.
Step 5: Generate or edit
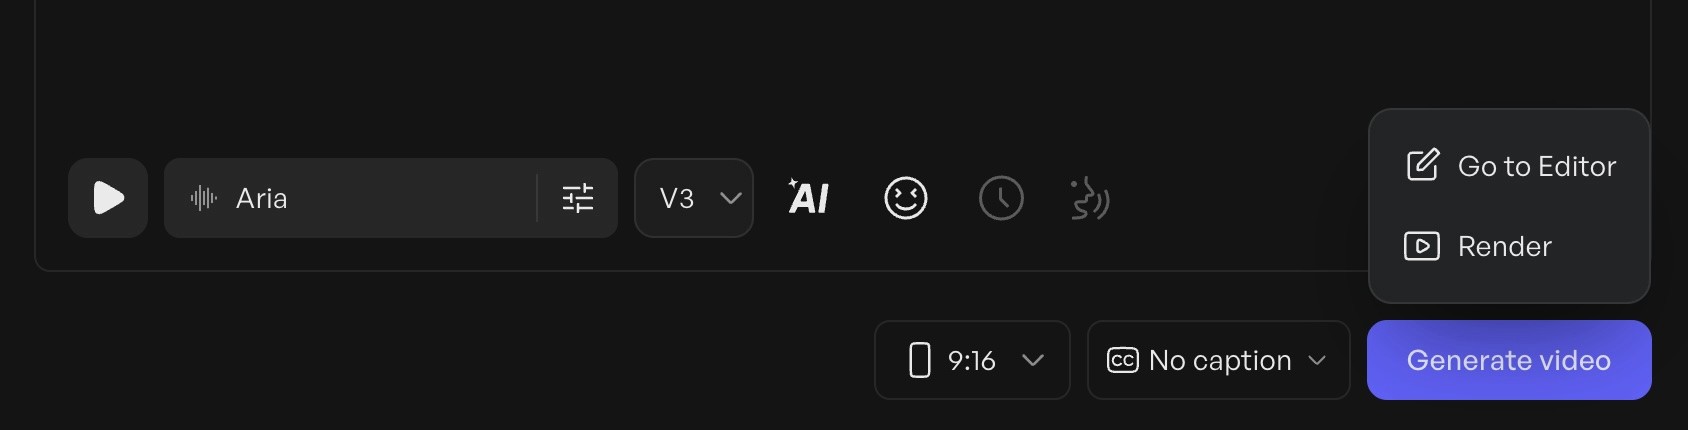
You have two options here:
Generate video: Click the blue "Generate video" button to create your avatar video immediately with your script and chosen settings
Go to Editor: Click "Go to Editor" if you want to add more elements before generating
Step 6: Enhance your reel in the editor (optional)
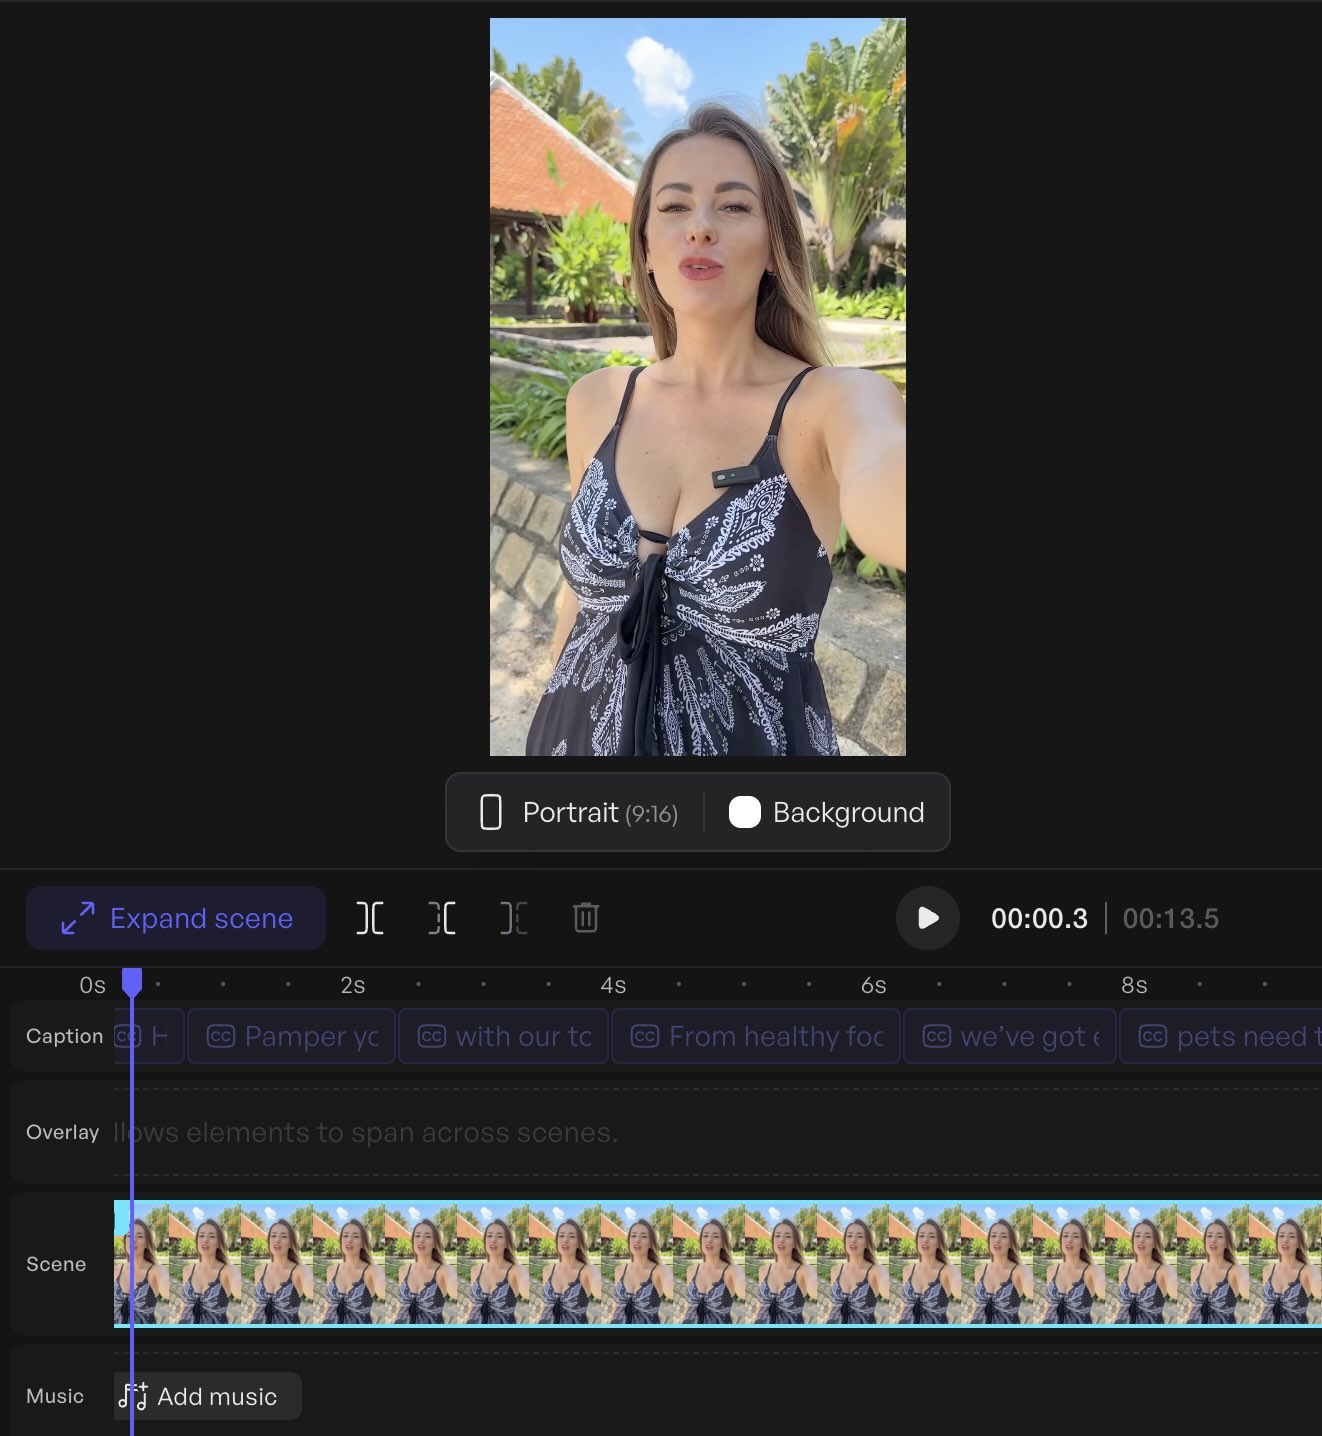
If you chose "Go to Editor," you can layer in additional elements:
Generate custom background music using AI music tools (perfect for creating unique audio that won't get flagged)
Add B-roll footage from Asset Generator or upload your own product shots
Create dynamic text overlays and title animations
Add transitions between scenes for multi-part reels
Layer in brand elements, logos, or call-to-action graphics
These editing capabilities let you turn a simple talking-head video into a polished reel with multiple visual elements - ideal for educational content, product explainers, or storytelling reels.
Step 7: Render and download
Once you're satisfied with your video (whether directly generated or enhanced in the editor), click "Render." After processing completes, download your video in 9:16 vertical format, ready to upload to Instagram.
This workflow is particularly useful for creating product explanation reels, educational content series, or testimonial-style videos at scale without coordinating filming schedules or appearing on camera yourself.
Fast batching workflow with AI tools
For creators making 5-10+ reels per week, batching saves hours:
Write 5-7 short scripts in one sitting (20-30 minutes)
Feed them to an AI reel generator like Creatify or upload to your reel maker app's template system
Customize hooks, CTAs, and thumbnail frames for each (10 minutes per reel)
Schedule or queue them for posting throughout the week
This separates ideation from execution - you're not trying to come up with ideas, film, edit, and post all in one session. Batch creation lets you enter "creation mode" once and produce a week's content.
Choosing a reel maker app that fits your workflow
If you're shopping for a dedicated reel maker app beyond Instagram's native tools, prioritize:
Vertical editing presets (9:16 templates that don't require manual resizing)
Built-in caption tools (auto-transcription or easy text overlay)
Audio library access (copyright-free music or trending sound integration)
High-quality export (1080p minimum, no watermarks on paid plans)
Beginners should start with all-in-one editors that simplify the interface - apps with drag-and-drop templates and one-click effects. Advanced users who want granular control over timing, layering, and motion graphics should look at pro-level tools with timeline editing.
Free reel maker app options exist but usually add watermarks or limit exports. Paid plans ($10-30/month) remove restrictions and unlock features like batch export and custom branding.
Posting strategy that works with the algorithm
Post when your audience is most active, not generic "best times." Check Instagram Insights → Audience → Most Active Times to see when your specific followers are online. For most accounts, this is evenings (7-9pm) and lunch hours (12-1pm) in your audience's timezone.
Frequency matters less than consistency. Posting 3 reels per week consistently beats posting 10 one week and zero the next. The algorithm rewards accounts that show up regularly, not sporadically.
Reel length depends on content type. Reels can now run up to 3 minutes in Instagram's editor (and even longer via some uploads), but most data suggests shorter content performs better for reach. Use 15-30 seconds for quick tips and entertainment, 30-60 seconds for tutorials. Longer reels often see reduced algorithmic promotion unless retention stays exceptionally high throughout.
What Instagram's algorithm actually rewards
Instagram and major performance analyses highlight several key factors for Reels ranking:
Originality: Content that's yours, not reposted from TikTok or YouTube
Relevance: How well it matches what this specific viewer has engaged with before
Engagement quality: Saves, shares, and DM sends correlate more with reach than likes
Completion rate: Percentage watched matters more than total views
High-resolution, no watermarks: Clean video without TikTok, CapCut, or other platform branding
Reels with visible TikTok or other platform watermarks tend to perform worse in recommendations - Instagram has said it deprioritizes such content. Instead of reposting videos with their branding visible, re-edit your TikToks for Instagram (remove the watermark, adjust the caption, re-export clean).
How to test your content with trial reels, and get free traffic from Instagram
Instagram's new trial reels feature lets you test content with non-followers first before sharing it with your audience. This is useful if you want to experiment with new topics, formats, or styles without worrying about how your existing followers might react.
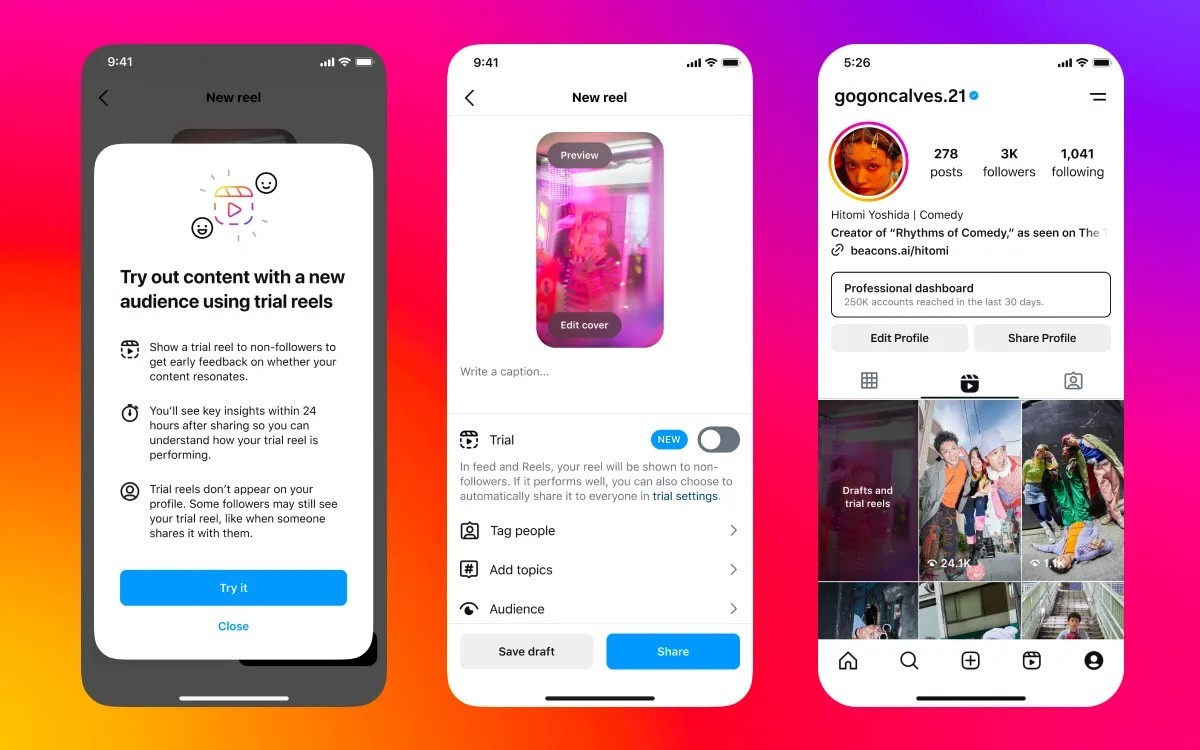
When you share a trial reel, it's shown only to non-followers initially - your followers won't see it in their feed or on your profile. After approximately 24 hours, you can review performance metrics (views, likes, comments, shares) and compare how it performed against previous trials.
If your trial reel performs well, you can manually tap "Share with everyone" to add it to your profile and distribute it to followers. Alternatively, you can enable auto-sharing when creating the trial - Instagram will automatically share it with your followers if it performs well based on views within the first 72 hours.
To create a trial reel, follow the normal reel creation process and toggle on "Trial" before sharing. Learn more about trial reels 👉 on Instagram's creators blog.
This feature is particularly valuable for creators who want to branch into new content niches, test different storytelling formats, or validate ideas before committing them to their main feed.
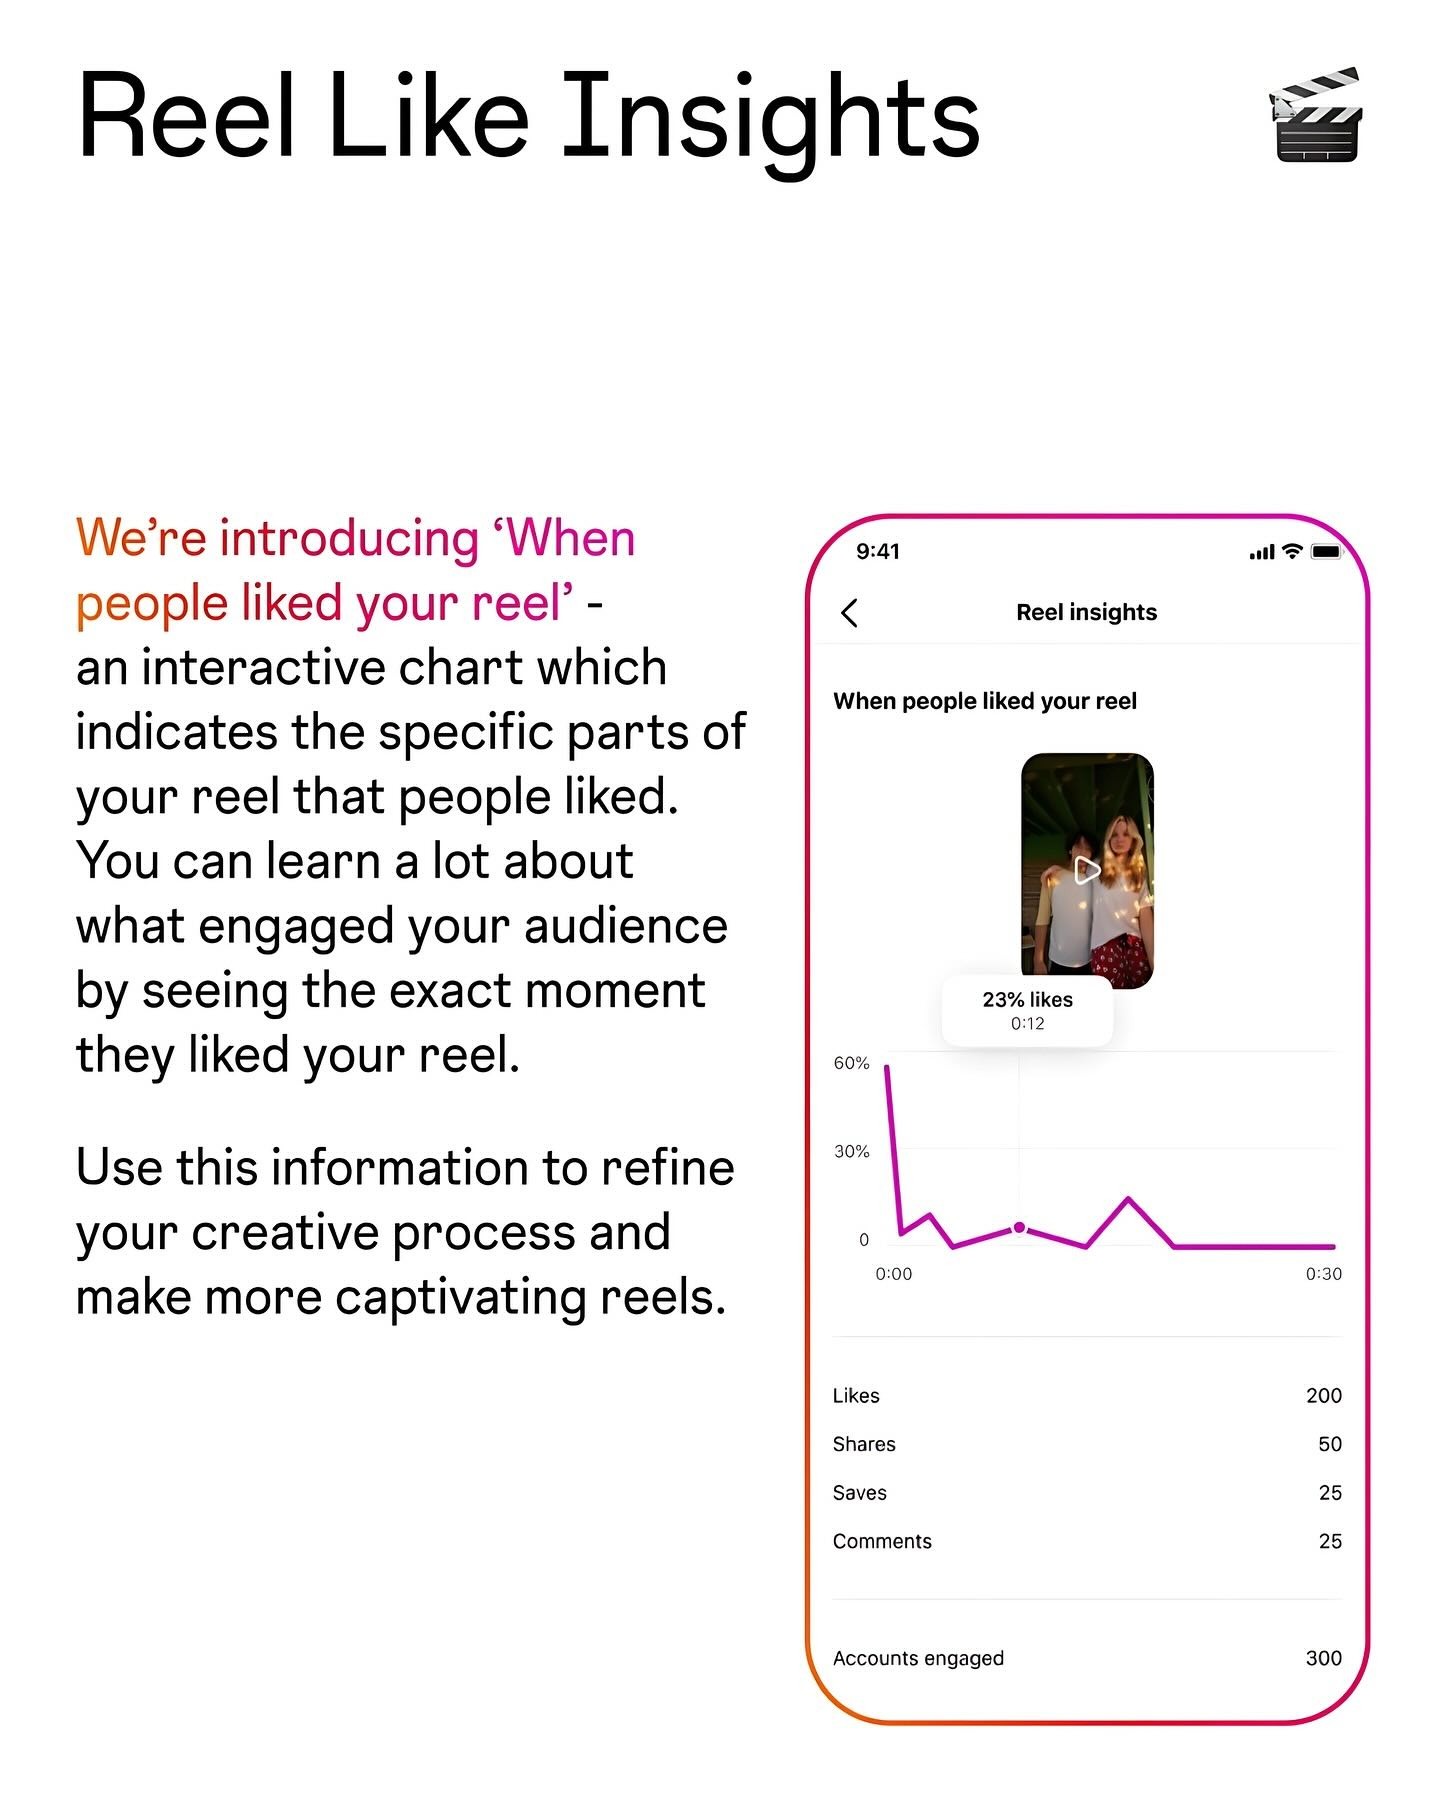
Reading your analytics to improve
Instagram Insights shows reach (total accounts who saw it), plays (how many times it was played), engagement (likes, comments, saves, shares), and retention (how much of the video people watched).
Track these metrics per reel:
Plays: Measures distribution reach
Average watch time: Shows if your hook and pacing work
Saves: Indicates educational or reference value
Shares: Signals entertainment or relatable content
Profile visits: Shows if you're attracting the right audience
Experiment with 3-5 different hook styles, then double down on what your audience actually watches and saves. If your tutorials get high saves but low shares, lean into educational content. If your behind-the-scenes reels get high shares but low saves, focus on entertainment and relatability.
Advanced tactics for standing out
Creators often find that pattern interruption beats polished perfection. Unusual framing, unexpected cold opens, or playful visuals that contrast with typical talking-head content tend to grab attention in crowded feeds.
Examples that work:
Start mid-sentence instead of introducing yourself
Use unconventional angles (top-down, through objects, reflections)
Begin with a visual contradiction ("This is what everyone does" shows the wrong way first)
Create deliberate awkward pauses or unexpected silence
Series-based content builds anticipation and trains viewers to come back. "Day X of [topic]," weekly segments, or numbered parts of a larger story encourage people to follow so they don't miss updates.
Cross-posting to other platforms works if you adapt the content for each audience. Remove Instagram branding before posting to TikTok, adjust hooks to match platform culture (TikTok is more casual, LinkedIn more professional), and optimize text size for different screen viewing patterns.
What are the niche-specific reel ideas that perform?
For educators and coaches:
Myth-busting reels ("Everyone says X, here's why it's wrong")
Quick tutorials broken into 3-5 steps
Before/after transformations with client results
FAQ responses using the Questions sticker
"Day in the life" showing your actual workflow
For product-based businesses:
Product demos showing unexpected uses
Unboxing or packaging reveals
Side-by-side comparisons vs competitors
Customer testimonials or UGC reposted with permission
Behind-the-scenes of how products are made
For service businesses:
Common mistakes in your industry
Case study breakdowns (problem → solution → result)
Tool or resource recommendations
"What $X gets you" pricing transparency reels
Process walkthroughs showing your methodology
For no-face content:
Text-on-background with voiceover
Screen recordings with commentary
Product footage with text overlays
B-roll montages synced to music
AI avatar videos explaining concepts
Advanced creators can layer audience research into reel planning. Check your DMs for common questions, use Google Search Console to see what queries bring people to your site, and monitor competitor comments to find gaps in existing content.
How to post your reel to Instagram
Once your reel is edited and ready, here's how to publish it properly:
[Screenshot placeholder: Instagram app home screen with + icon highlighted]
Step 1: Open Instagram and tap the + icon at the top, then select Reel from the options.
[Screenshot placeholder: Reel creation interface with upload option]
Step 2: Tap the gallery icon to upload your pre-edited video, or tap and hold the record button to film directly in the app.
[Screenshot placeholder: Editing interface with audio, text, and effect options]
Step 3: Add any final touches using Instagram's editing tools:
Tap Audio to add trending sounds or original audio
Tap Text to add captions or overlays
Tap Stickers to add polls, questions, or location tags
Adjust Clip length if you need to trim
[Screenshot placeholder: Caption and settings screen]
Step 4: Tap Next and write your caption:
First line should hook readers (shows before "...more")
Include 3-5 relevant hashtags naturally in the caption
Add a call-to-action at the end
Step 5: Choose your settings:
Cover image: Select a clear thumbnail frame
Share to Feed: Toggle on if you want it on your main profile grid
Share to Facebook: Toggle if cross-posting
Turn off commenting: Usually leave this on unless needed
[Screenshot placeholder: Final posting screen with Share button]
Step 6: Tap Share to publish your reel. It will appear in the Reels tab immediately and may take 10-20 minutes to start appearing in feeds and Explore.
After posting, many creators report that heavily editing the caption or deleting and reposting within the first hour can disrupt initial performance. If you spot a minor typo, consider fixing it after the first hour when engagement momentum has built.
FAQ
How long should my Instagram reel be?
Reels can run up to about 3 minutes in the Reels editor, and even longer via some uploads. However, shorter content typically gets better reach - most data shows 15-30 seconds works best for quick tips or hooks, while 30-60 seconds suits tutorials requiring explanation. Longer clips can work if retention stays high throughout, but the algorithm generally favors content that keeps viewers watching to completion.
What's the best reel maker app for beginners?
Instagram's native reel maker works well for beginners because it's free, requires no export step, and integrates trending audio seamlessly. If you want more editing control, CapCut and InShot are popular free reel maker apps with intuitive interfaces. Creatify's AI Avatar feature is ideal if you want to create talking-head reels without filming yourself.
Do I need trending audio to make my reel go viral?
Trending audio helps with discoverability but isn't required. Educational content, tutorials, and behind-the-scenes reels often perform better with original audio or voiceover than random trending songs. Test both - use trending audio for entertainment/lifestyle content and original audio for teaching/explaining content.
How do I make a reel without showing my face?
Create no-face reels using text-on-background with voiceover, screen recordings with commentary, product B-roll with text overlays, or AI avatar videos. Tools like Creatify let you generate realistic avatar presenters from scripts, eliminating the need to appear on camera while still having a human presence.
Can I use an AI reel generator and still get good engagement?
Yes, if you add your own perspective and don't rely on generic templates. Use AI tools to handle tedious tasks (generating B-roll, transcribing captions, creating avatar videos) but add your unique hook, personal examples, or custom footage. Pure AI content without human input looks generic - blending AI efficiency with your creativity works.
How often should I post reels to grow my account?
Consistency beats frequency. Posting 3-4 quality reels per week consistently outperforms posting 10 reels one week and zero the next. The algorithm rewards regular activity. Focus on maintaining a schedule you can sustain long-term rather than burning out with daily posts.
Why aren't my reels getting views?
Low reel views usually stem from: weak hooks that don't grab attention in 2 seconds, reposted content with other platform watermarks, poor audio quality, or posting at times when your audience isn't active. Check Instagram Insights to see when your followers are online, improve your opening hook, and ensure you're uploading native content without TikTok or YouTube branding.
What's the difference between a reel maker and an AI reel generator?
A reel maker is any tool that helps you edit and create reels - this includes Instagram's native editor, apps like CapCut, or professional software. An AI reel generator specifically uses artificial intelligence to automate parts of creation, like generating scripts, creating avatar videos, producing B-roll footage, or auto-editing clips to music beats. Most AI reel generators are also reel makers, but not all reel makers use AI.
What are trial reels and should I use them?
Trial reels are Instagram's feature that lets you test content with non-followers before sharing it with your audience. Your trial reel won't appear on your profile or in followers' feeds until you decide to share it with everyone (or let Instagram auto-share if it performs well). This is useful for experimenting with new content styles, topics outside your niche, or formats you're unsure about without risking your follower engagement. If you're testing new creative directions or want data before committing content to your main feed, trial reels are worth using.
How to make a great reel: Create engaging Instagram content in minutes
Instagram Reels get more reach than posts or Stories, but most creators struggle with production time and editing skills. This guide walks you through making scroll-stopping reels quickly - from planning and shooting to editing and posting, with workflows that work whether you're filming yourself or using AI tools.
Why Instagram Reels matter right now
Recent data shows Reels averaging 2-3x more reach than static posts for most accounts. The algorithm heavily favors video content in Explore and recommendation surfaces, pushing reels to non-followers' feeds more aggressively than photos or carousels.
But views alone don't define a great reel. What matters is retention (how long people watch), saves (people bookmarking your content), shares (sending to friends), and profile visits. Creators consistently find that these engagement signals correlate more with reach than likes alone - saves, shares, and completion rate tend to predict performance better than raw like counts.
Source: Instagram.com
Modern reel makers - from Instagram's native editor to AI reel generators - let anyone create polished content fast. You don't need fancy equipment or editing skills anymore. You need a hook, clear value, and the right tools.
What makes a reel actually "great"
Great reels hook viewers in the first 1-2 seconds, deliver clear value, and end with a satisfying payoff or call-to-action. They're shot vertically (9:16 format), visually clear, and keep attention through pacing - not just flashy transitions.
The algorithm cares about watch time (how much of your video people watch), replays (watching it again), saves (bookmarking for later), and shares (sending to friends). These engagement signals matter more than likes because they show genuine value.
Reels perform best when they're "native" - created for Instagram without watermarks from other platforms. TikTok logos, YouTube timestamps, or video templates with competitor branding hurt reach. The algorithm wants platform-first content.
Planning your reel in minutes
Start with a goal: reach (discovery), trust-building (authority), clicks (traffic), or sales (conversion). Every reel should have one clear purpose that shapes your hook and call-to-action.
Use a simple 3-part structure: hook (first 2 seconds grabs attention) → value (middle delivers on the promise) → call-to-action (end tells them what to do next). This framework works for everything from tutorials to product showcases.
Beginners can use plug-and-play templates:
Before/After: Show transformation in 15 seconds
3 tips format: "3 mistakes everyone makes with X"
Do this, not that: Side-by-side comparison
Day in the life: Behind-the-scenes workflow
Quick tutorial: Single problem, single solution
Pair your script with simple B-roll ideas: hands working, product close-ups, workspace shots, screen recordings, or text-on-background slides. You don't need complex filming.
How to make a reel using Instagram's native editor
Open Instagram and tap the plus icon, then select "Reel." You can record directly in the app or upload pre-recorded clips from your camera roll.
Instagram's reel maker includes essential tools:
Speed control: Adjust playback speed for dramatic or comedic effect
Timer: Set a countdown for hands-free recording
Alignment: Line up multiple takes perfectly
Text overlays: Add captions that sync with your video
Stickers and filters: Quick visual enhancements
Audio library: Search trending sounds and music
Add captions by tapping the "Captions" button after recording - Instagram's auto-caption feature transcribes speech automatically. Burned-in subtitles (text that's part of the video, not just captions) improve retention because 85% of videos are watched without sound.
Shooting basics that actually matter
Shoot vertically in 9:16 format (full-screen mobile). Horizontal videos get cropped and lose impact. Use the full screen space.
Good lighting beats expensive cameras every time. Film facing a window for natural light, or use a basic ring light if filming at night. Avoid overhead lighting that creates harsh shadows.
Clear audio is non-negotiable. Film in quiet spaces, speak clearly toward your phone's microphone, or use a $20 lavalier mic if you're doing regular talking-head content.
Simple setups work: phone propped on books, small tripod, or even leaned against a laptop. Your background should be clean but not sterile - a workspace, bookshelf, or plain wall all work better than a messy room.
Crafting scroll-stopping hooks
In practice, the first 1-2 seconds often decide if people keep watching or scroll past. Start with immediate value or curiosity - no lengthy intros.
High-impact hooks that work:
Pattern interrupt: "Stop doing this with your Instagram bio"
Surprising claim: "Nobody tells you this about engagement rates"
Visual change: Jump cut from problem to solution immediately
Direct address: "If you're posting Reels and getting 200 views..."
Urgency: "Instagram just changed how Reels work"
Put your hook in on-screen text too, not just voiceover. Many people scroll with sound off and only unmute if the text grabs them. Use large, high-contrast text that's readable instantly.
Source: pexels.com
Storytelling in 15-90 seconds
Short-form video requires micro-storytelling frameworks:
Problem → tension → fix: Show the pain, amplify why it matters, deliver the solution
Myth → truth: Bust a common misconception with proof
Step-by-step process: Break down a complex task into 3-5 quick steps
Pace your cuts roughly every 1.5-2 seconds to maintain attention without overwhelming viewers. This doesn't mean frantic jump cuts - it means changing the visual element (new shot, text overlay, zoom, or angle shift) frequently enough to keep eyes on screen. Many creators find this rhythm works well for retention.
Build to a payoff. Don't just stop - end with a clear takeaway, transformation result, or call-to-action that makes watching feel worthwhile.
Editing workflow: Native vs third-party reel maker apps
You can edit directly in Instagram's reel maker or use a dedicated reel maker app to pre-edit, then upload. Each approach has tradeoffs.
Instagram's native editor:
Pros: No export/upload time, works with trending audio seamlessly, no quality loss
Cons: Limited editing features, harder to batch-create content, can't save drafts externally
Third-party reel maker apps:
Pros: More control over timing, effects, and transitions; can batch-produce content; save templates
Cons: Must export and re-upload (adds time), might lose some quality, trending audio requires more steps
For beginners, Instagram's native tools are usually enough. For people making 10+ reels weekly, a dedicated reel maker app saves time through templates and batch workflows.
Advanced editing techniques that improve retention:
Jump cuts: Remove dead air and "um"s to tighten pacing
J-cuts: Audio from the next clip starts before the visual cut (creates smooth transitions)
Beat markers: Time visual cuts to music beats for satisfying rhythm
Selective slow-motion: Emphasize key moments without slowing the whole clip
Smart use of audio, text, and captions
Trending audio can boost discoverability because Instagram pushes content using popular sounds to more feeds. Search the audio library for sounds with "Trending" labels.
But original audio has value too - it becomes your branded sound that people associate with your content, and it can be repurposed across platforms without copyright issues. For tutorials and educational content, original audio often performs better than random trending songs.
On-screen text best practices:
Use big, bold fonts with high contrast (white text on dark background or vice versa)
Keep essential text in the "safe zone" (middle 60% of screen, avoiding top/bottom where UI elements appear)
Sync text appearance to moments in your story - new text appears when you make new points
Limit text per frame to one key sentence so it's readable in 2 seconds
Caption strategy matters beyond just the video's text overlays. Your written caption should have a compelling first line (the hook before "...more"), include relevant keywords naturally, and end with a clear call-to-action like "Save this for later" or "Follow for daily tips."
Making reels with AI tools (without losing authenticity)
AI reel generators are useful for specific workflows - not replacing creativity, but handling tedious production tasks.
Realistic use cases where AI actually helps:
Turning blog posts or scripts into video outlines
Generating B-roll footage when you don't have original footage
Auto-generating captions and subtitles
Creating avatar-based talking head videos when you don't want to appear on camera
Producing multiple variations of the same core message for testing
The key is adding your own voice, footage, or commentary on top of AI-generated bases. Generic AI templates that use stock everything strip away the personality that makes content engaging.
How to create a reel with Creatify's AI Avatar
If you want to create talking-head style reels without filming yourself, Creatify's AI Avatar feature lets you generate realistic avatar videos from just a script.
Step 1: Start with AI Avatar
Open Creatify and click on AI Avatar. You'll see two options: choose from the avatar library (1,500+ realistic AI avatars) or upload your own image to create a custom avatar (BYOA).
Step 2: Select your avatar
If choosing from the library, browse by type (realistic or styled), gender, age group, or industry to find an avatar that matches your brand personality and target audience. Filter by characteristics like "Young Adult" for a younger demographic or specific industries like "Business Services" or "Education."
If uploading your own image, select a clear photo where the face is well-lit and facing forward - this creates your personalized talking avatar.
Step 3: Write your script
Input your reel script in the text box (up to 4,000 characters). Keep it under 60 seconds of speaking time for Instagram reels. Structure it with your hook in the first sentence, core value in the middle, and CTA at the end.
Step 4: Choose voice and settings
Select from 140+ AI voices across 75+ languages. Pick a voice that sounds natural for your content style - preview a few options before choosing. Adjust voice settings like tone and pacing if needed.
Step 5: Generate or edit
You have two options here:
Generate video: Click the blue "Generate video" button to create your avatar video immediately with your script and chosen settings
Go to Editor: Click "Go to Editor" if you want to add more elements before generating
Step 6: Enhance your reel in the editor (optional)
If you chose "Go to Editor," you can layer in additional elements:
Generate custom background music using AI music tools (perfect for creating unique audio that won't get flagged)
Add B-roll footage from Asset Generator or upload your own product shots
Create dynamic text overlays and title animations
Add transitions between scenes for multi-part reels
Layer in brand elements, logos, or call-to-action graphics
These editing capabilities let you turn a simple talking-head video into a polished reel with multiple visual elements - ideal for educational content, product explainers, or storytelling reels.
Step 7: Render and download
Once you're satisfied with your video (whether directly generated or enhanced in the editor), click "Render." After processing completes, download your video in 9:16 vertical format, ready to upload to Instagram.
This workflow is particularly useful for creating product explanation reels, educational content series, or testimonial-style videos at scale without coordinating filming schedules or appearing on camera yourself.
Fast batching workflow with AI tools
For creators making 5-10+ reels per week, batching saves hours:
Write 5-7 short scripts in one sitting (20-30 minutes)
Feed them to an AI reel generator like Creatify or upload to your reel maker app's template system
Customize hooks, CTAs, and thumbnail frames for each (10 minutes per reel)
Schedule or queue them for posting throughout the week
This separates ideation from execution - you're not trying to come up with ideas, film, edit, and post all in one session. Batch creation lets you enter "creation mode" once and produce a week's content.
Choosing a reel maker app that fits your workflow
If you're shopping for a dedicated reel maker app beyond Instagram's native tools, prioritize:
Vertical editing presets (9:16 templates that don't require manual resizing)
Built-in caption tools (auto-transcription or easy text overlay)
Audio library access (copyright-free music or trending sound integration)
High-quality export (1080p minimum, no watermarks on paid plans)
Beginners should start with all-in-one editors that simplify the interface - apps with drag-and-drop templates and one-click effects. Advanced users who want granular control over timing, layering, and motion graphics should look at pro-level tools with timeline editing.
Free reel maker app options exist but usually add watermarks or limit exports. Paid plans ($10-30/month) remove restrictions and unlock features like batch export and custom branding.
Posting strategy that works with the algorithm
Post when your audience is most active, not generic "best times." Check Instagram Insights → Audience → Most Active Times to see when your specific followers are online. For most accounts, this is evenings (7-9pm) and lunch hours (12-1pm) in your audience's timezone.
Frequency matters less than consistency. Posting 3 reels per week consistently beats posting 10 one week and zero the next. The algorithm rewards accounts that show up regularly, not sporadically.
Reel length depends on content type. Reels can now run up to 3 minutes in Instagram's editor (and even longer via some uploads), but most data suggests shorter content performs better for reach. Use 15-30 seconds for quick tips and entertainment, 30-60 seconds for tutorials. Longer reels often see reduced algorithmic promotion unless retention stays exceptionally high throughout.
What Instagram's algorithm actually rewards
Instagram and major performance analyses highlight several key factors for Reels ranking:
Originality: Content that's yours, not reposted from TikTok or YouTube
Relevance: How well it matches what this specific viewer has engaged with before
Engagement quality: Saves, shares, and DM sends correlate more with reach than likes
Completion rate: Percentage watched matters more than total views
High-resolution, no watermarks: Clean video without TikTok, CapCut, or other platform branding
Reels with visible TikTok or other platform watermarks tend to perform worse in recommendations - Instagram has said it deprioritizes such content. Instead of reposting videos with their branding visible, re-edit your TikToks for Instagram (remove the watermark, adjust the caption, re-export clean).
How to test your content with trial reels, and get free traffic from Instagram
Instagram's new trial reels feature lets you test content with non-followers first before sharing it with your audience. This is useful if you want to experiment with new topics, formats, or styles without worrying about how your existing followers might react.
When you share a trial reel, it's shown only to non-followers initially - your followers won't see it in their feed or on your profile. After approximately 24 hours, you can review performance metrics (views, likes, comments, shares) and compare how it performed against previous trials.
If your trial reel performs well, you can manually tap "Share with everyone" to add it to your profile and distribute it to followers. Alternatively, you can enable auto-sharing when creating the trial - Instagram will automatically share it with your followers if it performs well based on views within the first 72 hours.
To create a trial reel, follow the normal reel creation process and toggle on "Trial" before sharing. Learn more about trial reels 👉 on Instagram's creators blog.
This feature is particularly valuable for creators who want to branch into new content niches, test different storytelling formats, or validate ideas before committing them to their main feed.
Reading your analytics to improve
Instagram Insights shows reach (total accounts who saw it), plays (how many times it was played), engagement (likes, comments, saves, shares), and retention (how much of the video people watched).
Track these metrics per reel:
Plays: Measures distribution reach
Average watch time: Shows if your hook and pacing work
Saves: Indicates educational or reference value
Shares: Signals entertainment or relatable content
Profile visits: Shows if you're attracting the right audience
Experiment with 3-5 different hook styles, then double down on what your audience actually watches and saves. If your tutorials get high saves but low shares, lean into educational content. If your behind-the-scenes reels get high shares but low saves, focus on entertainment and relatability.
Advanced tactics for standing out
Creators often find that pattern interruption beats polished perfection. Unusual framing, unexpected cold opens, or playful visuals that contrast with typical talking-head content tend to grab attention in crowded feeds.
Examples that work:
Start mid-sentence instead of introducing yourself
Use unconventional angles (top-down, through objects, reflections)
Begin with a visual contradiction ("This is what everyone does" shows the wrong way first)
Create deliberate awkward pauses or unexpected silence
Series-based content builds anticipation and trains viewers to come back. "Day X of [topic]," weekly segments, or numbered parts of a larger story encourage people to follow so they don't miss updates.
Cross-posting to other platforms works if you adapt the content for each audience. Remove Instagram branding before posting to TikTok, adjust hooks to match platform culture (TikTok is more casual, LinkedIn more professional), and optimize text size for different screen viewing patterns.
What are the niche-specific reel ideas that perform?
For educators and coaches:
Myth-busting reels ("Everyone says X, here's why it's wrong")
Quick tutorials broken into 3-5 steps
Before/after transformations with client results
FAQ responses using the Questions sticker
"Day in the life" showing your actual workflow
For product-based businesses:
Product demos showing unexpected uses
Unboxing or packaging reveals
Side-by-side comparisons vs competitors
Customer testimonials or UGC reposted with permission
Behind-the-scenes of how products are made
For service businesses:
Common mistakes in your industry
Case study breakdowns (problem → solution → result)
Tool or resource recommendations
"What $X gets you" pricing transparency reels
Process walkthroughs showing your methodology
For no-face content:
Text-on-background with voiceover
Screen recordings with commentary
Product footage with text overlays
B-roll montages synced to music
AI avatar videos explaining concepts
Advanced creators can layer audience research into reel planning. Check your DMs for common questions, use Google Search Console to see what queries bring people to your site, and monitor competitor comments to find gaps in existing content.
How to post your reel to Instagram
Once your reel is edited and ready, here's how to publish it properly:
[Screenshot placeholder: Instagram app home screen with + icon highlighted]
Step 1: Open Instagram and tap the + icon at the top, then select Reel from the options.
[Screenshot placeholder: Reel creation interface with upload option]
Step 2: Tap the gallery icon to upload your pre-edited video, or tap and hold the record button to film directly in the app.
[Screenshot placeholder: Editing interface with audio, text, and effect options]
Step 3: Add any final touches using Instagram's editing tools:
Tap Audio to add trending sounds or original audio
Tap Text to add captions or overlays
Tap Stickers to add polls, questions, or location tags
Adjust Clip length if you need to trim
[Screenshot placeholder: Caption and settings screen]
Step 4: Tap Next and write your caption:
First line should hook readers (shows before "...more")
Include 3-5 relevant hashtags naturally in the caption
Add a call-to-action at the end
Step 5: Choose your settings:
Cover image: Select a clear thumbnail frame
Share to Feed: Toggle on if you want it on your main profile grid
Share to Facebook: Toggle if cross-posting
Turn off commenting: Usually leave this on unless needed
[Screenshot placeholder: Final posting screen with Share button]
Step 6: Tap Share to publish your reel. It will appear in the Reels tab immediately and may take 10-20 minutes to start appearing in feeds and Explore.
After posting, many creators report that heavily editing the caption or deleting and reposting within the first hour can disrupt initial performance. If you spot a minor typo, consider fixing it after the first hour when engagement momentum has built.
FAQ
How long should my Instagram reel be?
Reels can run up to about 3 minutes in the Reels editor, and even longer via some uploads. However, shorter content typically gets better reach - most data shows 15-30 seconds works best for quick tips or hooks, while 30-60 seconds suits tutorials requiring explanation. Longer clips can work if retention stays high throughout, but the algorithm generally favors content that keeps viewers watching to completion.
What's the best reel maker app for beginners?
Instagram's native reel maker works well for beginners because it's free, requires no export step, and integrates trending audio seamlessly. If you want more editing control, CapCut and InShot are popular free reel maker apps with intuitive interfaces. Creatify's AI Avatar feature is ideal if you want to create talking-head reels without filming yourself.
Do I need trending audio to make my reel go viral?
Trending audio helps with discoverability but isn't required. Educational content, tutorials, and behind-the-scenes reels often perform better with original audio or voiceover than random trending songs. Test both - use trending audio for entertainment/lifestyle content and original audio for teaching/explaining content.
How do I make a reel without showing my face?
Create no-face reels using text-on-background with voiceover, screen recordings with commentary, product B-roll with text overlays, or AI avatar videos. Tools like Creatify let you generate realistic avatar presenters from scripts, eliminating the need to appear on camera while still having a human presence.
Can I use an AI reel generator and still get good engagement?
Yes, if you add your own perspective and don't rely on generic templates. Use AI tools to handle tedious tasks (generating B-roll, transcribing captions, creating avatar videos) but add your unique hook, personal examples, or custom footage. Pure AI content without human input looks generic - blending AI efficiency with your creativity works.
How often should I post reels to grow my account?
Consistency beats frequency. Posting 3-4 quality reels per week consistently outperforms posting 10 reels one week and zero the next. The algorithm rewards regular activity. Focus on maintaining a schedule you can sustain long-term rather than burning out with daily posts.
Why aren't my reels getting views?
Low reel views usually stem from: weak hooks that don't grab attention in 2 seconds, reposted content with other platform watermarks, poor audio quality, or posting at times when your audience isn't active. Check Instagram Insights to see when your followers are online, improve your opening hook, and ensure you're uploading native content without TikTok or YouTube branding.
What's the difference between a reel maker and an AI reel generator?
A reel maker is any tool that helps you edit and create reels - this includes Instagram's native editor, apps like CapCut, or professional software. An AI reel generator specifically uses artificial intelligence to automate parts of creation, like generating scripts, creating avatar videos, producing B-roll footage, or auto-editing clips to music beats. Most AI reel generators are also reel makers, but not all reel makers use AI.
What are trial reels and should I use them?
Trial reels are Instagram's feature that lets you test content with non-followers before sharing it with your audience. Your trial reel won't appear on your profile or in followers' feeds until you decide to share it with everyone (or let Instagram auto-share if it performs well). This is useful for experimenting with new content styles, topics outside your niche, or formats you're unsure about without risking your follower engagement. If you're testing new creative directions or want data before committing content to your main feed, trial reels are worth using.